How to Make ACH Vendor Payments in Sage Intacct
Many businesses use Automated Clearing House (ACH) to make payments to vendors. ACH payments are faster and more reliable than paper checks, and they’re a great (and low-cost) alternative to virtual cards or wire transfers. Plus, they’re easy to track and manage, which is great for managing cash flow.
I already use Sage Intacct ERP for financial management and accounts receivable, and I’m considering using Intacct’s account payables feature to make ACH payments to my vendors. I know that Sage offers basic AP and payment functionality in its core ERP platform. In early 2023, they also launched an automated payment solution for Intacct in partnership with CSI. I’d like to know if either of these payment solutions is the right choice for my business or if I should be looking at other solutions that are a better fit.
In this article, we’ll talk through the basic steps to set up ACH and to make an ACH payment in Intacct. We’ll also talk about other payment options you can use if Intacct’s bundled AP solution doesn’t meet your business needs.
How vendor payments work in Sage Intacct
Intacct facilitates vendor payments by check, credit card, or ACH/bank file through its accounts payable module. In order to pay vendor invoices through Intacct, you need to upload the invoices into Intacct. From there, you can use Intacct to verify and send the invoices for approval. You will need to set up the workflows for the upload, verification, and approval processes in Intacct before you can pay invoices.
From the Intacct Pay Bills screen, you can select bills to be paid, set the payment types and billing dates, and change other payment parameters before paying a bill.
In February 2023, Intacct introduced new automated AP and payments functionality that streamlines many of these workflows. However, the automated solution requires you to use CSI for vendor payments, and the automated solution may not be ideal for your business if you prefer to choose your own payment provider.
How ACH works
The ACH Network is a payment system that reaches all US banks and credit unions to facilitate sending and receiving funds between accounts. ACH provides a secure and fast alternative to wire transfers for electronic payments and transfers. In 2022, businesses and individuals made 30 billion ACH payments with a total value of $72.62 trillion.
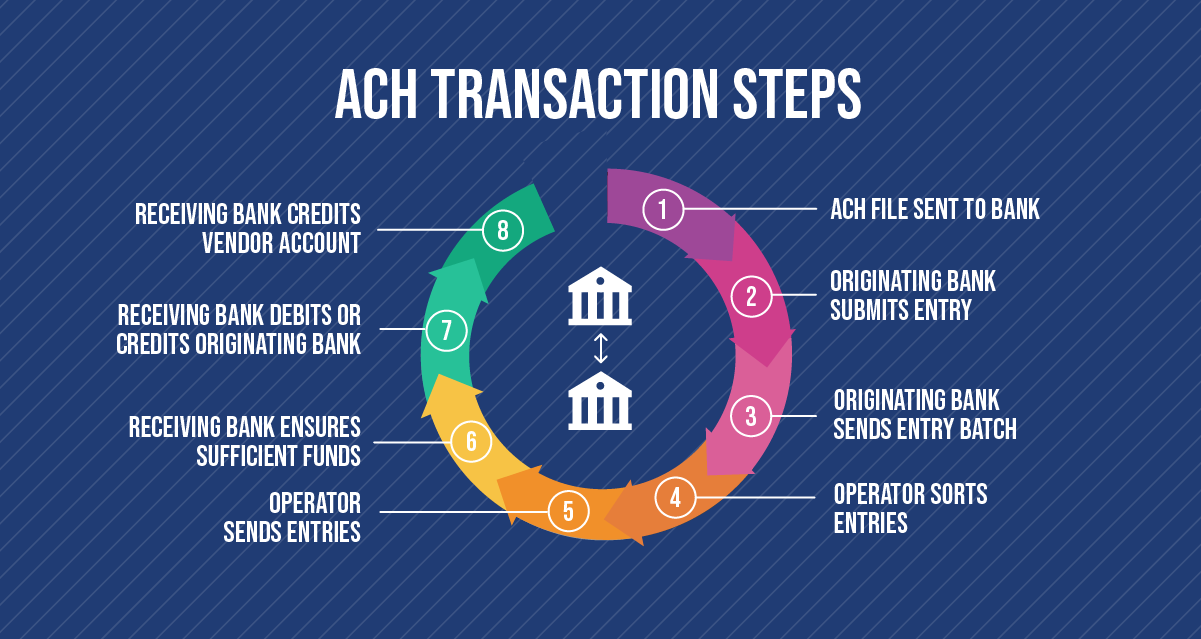
In a nutshell, ACH acts as a channel for transferring money between bank accounts. A basic ACH transaction requires information for the business sending and receiving the money. When an ACH transfer is initiated, the sending business notifies its bank of the amount of the transfer and the details for the recipient. For multiple vendor payments, businesses can use a payment solution (such as Intacct or Stampli Direct Pay) to create an ACH file that includes instructions and information for each recipient. You send the ACH file to your bank, which then sorts the transactions, transfers the funds to the recipients, and debits the sender’s account by the total amount of the ACH payments.
For efficiency, banks make ACH transfers in batches several times a day. Depending on how individual banks handle ACH transfers, payments usually take 1 – 3 business days to complete.
Making ACH vendor payments in Intacct
Setting up ACH vendor payments in Intacct is a two-step process. First, you need to set up ACH for the bank accounts you use to pay vendor invoices, and second, you need to set up ACH information for each vendor you want to pay.
Let’s look at these steps.
How to Set up ACH payments in Intacct
Before I can make ACH payments with Intacct, I need to gather some information.
First, I need to sign up for ACH payments with my bank and ask for their ACH specification sheet. The specification sheet has the information I need to set up Intacct to make ACH payments.
Next, I need to contact the vendors I plan to pay through ACH and get their bank account details so I can send them money.
Once I’ve gathered this info, I can begin setting up the ACH bank record in Intacct.
Creating the ACH bank record
To create the ACH bank record, I go to the ACH Bank Configuration page, found under Cash Management > Setup tab > More > ACH bank configurations.
On the ACH Bank Configuration screen, I fill in the ACH bank record information using my bank’s ACH specification sheet:
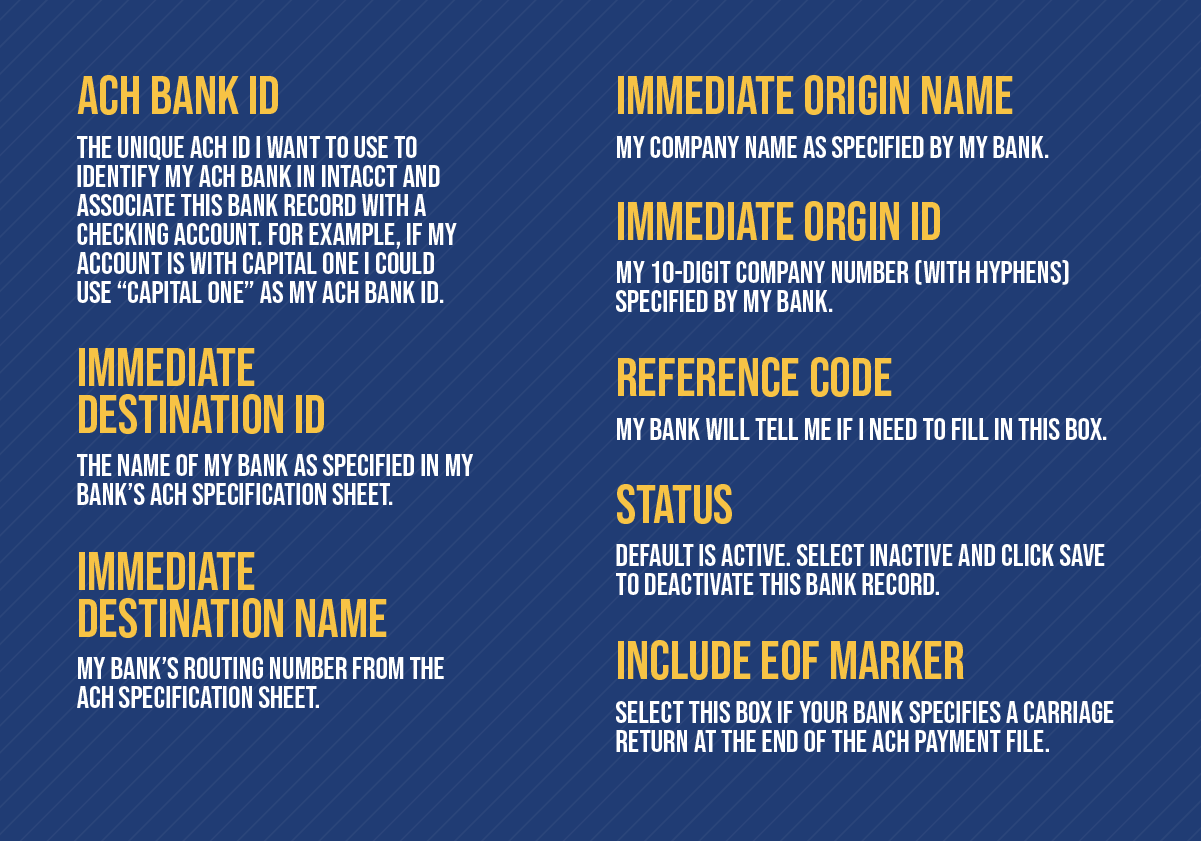
The information in the ACH bank record needs to be exact, so always double-check the record against the bank’s ACH specification sheet.
After I complete the ACH bank record, I click save and move on to setting up my checking accounts to make ACH payments.
Setting up checking accounts for ACH payments
To make ACH payments from Intacct, I need to associate at least one checking account with the ACH bank record for the bank where I have the account.
I start by going to Cash Management > All/Setup tab > Accounts > Checking > Edit and then the Bank file tab. Next, I select Enable ACH payments.
In the ACH setup section, I select the ACH bank ID of the ACH bank record I created for my bank. Intacct will pre-fill the rest of the information from the ACH bank record.
Select Use the recommended setup in the Payment numbering setup field. Selecting this enables me to generate a service class code 220 ACH payment file, which is the most common type of ACH file, and it also automatically sets up numbering sequences for ACH payments. If my bank requires service class code 200 (allowing debits and credits), I unselect this field and choose 200 (credits only) under the Service class code dropdown.
When I’m finished, I click Save, then start setting up my vendors to receive ACH payments.
Setting up vendors for ACH payments
Once I create the ACH bank record and associate it with my checking accounts, I can set up my vendors for ACH payments in Intacct. For this task, I need bank account information (Routing number, Account number, Account type) from each vendor.
To begin, I need to edit the vendor record. I go to Accounts Payable > All > Vendors > Edit and click the Bank file tab. Then, I click Enable ACH payments to open the ACH payments section. (Note: if I can’t see the ACH payments section, I need to ask my Intacct administrator for access.)
In the ACH payments section, I enter the Routing Number, Account Number, and Account Type. Then, in the Account Classification dropdown, I specify whether the account is personal or business. I can select a personal account if I am paying a vendor who operates as a sole proprietor or freelancer.
I have two options for business accounts: Business (CTX) or Business (CCD). I can ask my bank which of these two account types I should use.
Finally, I update permissions for the employees who will be processing ACH payments. I need to make the following changes to the permissions:

Intacct also allows me to import ACH information in a batch file to update the records for multiple vendors.
Now that I’ve edited the vendor records, I’m ready to make ACH payments to my suppliers.
How to make an ACH payment to a vendor
I can make ACH payments to my suppliers on the Pay Bills page in Intacct. I do this by selecting the bills I want to pay, choosing ACH payment, and creating an ACH payment file. Once I’ve verified the ACH payment file, I transfer it to my bank or payment provider to initiate the ACH payments.
Note: to pay vendor bills in Intacct, I need to enter, verify, and approve them in Intacct Accounts Payable first so they are listed on the Pay Bills page.
I start by opening the Pay Bills page at Accounts Payable > All tab > Pay bills. From there, I can use a filter to load the bills I want to pay. I can also configure the page to automatically show all ready-to-pay bills.
Once I’ve selected the bills I want to pay, I need to add the payment details. First, I select ACH/Bank File as the Payment method and set Use vendor preference as the Payment request method. Then I select which bank account I want to use from the Bank dropdown menu, set the payment date under Set payment date to, and verify that payment notifications are being sent from the right person by checking the Send payment notifications from box and updating the info if needed.
Once the payment information is set up and the bills to be paid are selected, I click Pay now to create the payment request for the bills. If my payment process is set up for payment approvals, clicking Pay now sends the payments for approval to be paid.
The next step in the process is to generate the ACH file to be sent to my bank.
Generating and sending the ACH file
After the payment request has been sent (and approved if needed), I can generate the ACH file. To do this, I go to Cash Management > All > ACH file generation. All the bills selected to be paid are listed on the Generate ACH File page. From there, I select all the payment requests and click Generate File to create the ACH file.
When the generated file is ready, it will be listed in the ACH Payment File screen. From here, I can download the file and verify it’s accurate. Once I’ve verified the file, I click Confirm to complete the payment and then send the completed and verified ACH file to my bank.
Once I’ve completed the payment, I can confirm that the bills were paid.
Confirming the ACH payment
To confirm that the bills were paid, I go to Accounts Payable > Bills to bring up the bill list and then click View next to the bills I want to confirm. Paid bills will be marked Paid in Full.
Bill payments are also listed in the Bills Register report.
After the vendor bills are paid in Intacct, my bank will send the vendor payments with their regular daily ACH batches.
Reconciling ACH payments
I can reconcile my ACH vendor payments using Intacct’s Bank Reconciliation functionality, located in Cash Management > Reconciliation > Bank. From there, I can review my bank statements and reconcile them to my transactions record in Intacct. I can apply filters to the transaction record to sort entries by general ledger date, vendor name, or other criteria to identify vendor payments.
Note that because my bank processes ACH transactions in batches, it will group ACH payments into a single transaction (debit) on my bank statement. That means I need to manually match each ACH vendor payment by hand or use Intacct’s match function to reconcile them to my transactions record.
Reconciling my ACH transactions lets me check that all transactions were made correctly and spot any errors or evidence of fraud.
Alternatives to Intacct for making ACH vendor payments
The main drawback to making ACH vendor payments in Intacct is that the entire process must occur in the Intacct environment. I may want an independent payment solution that gives me more freedom and flexibility in my payment methods. In addition, I may also want a more streamlined and automated process, but I’m not interested in committing to Intacct’s AP and payment automation solution.
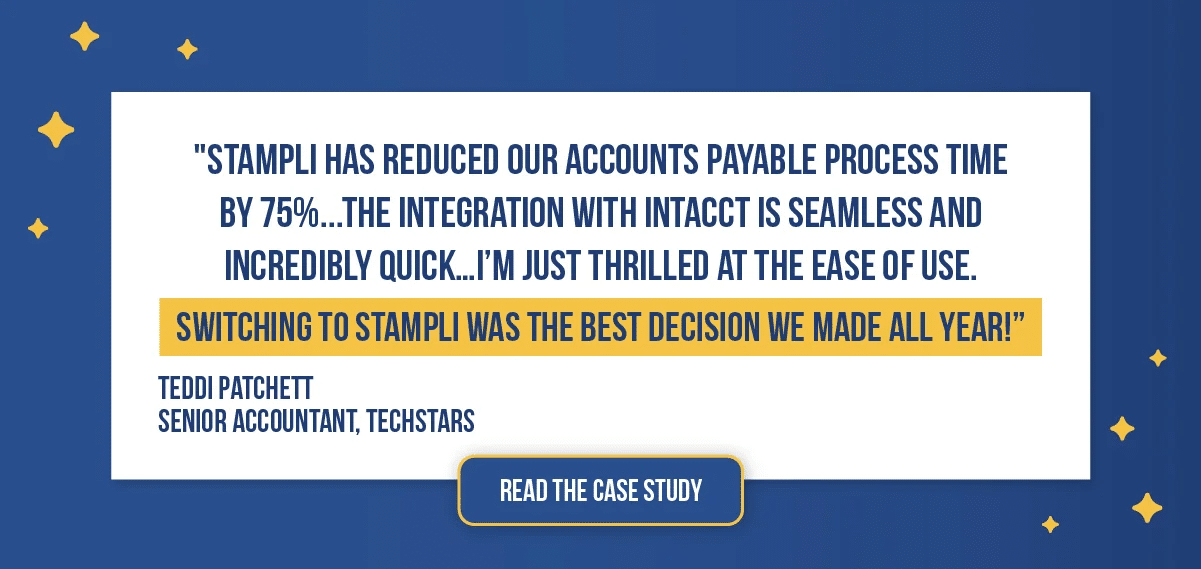
A standalone vendor payment service provides more flexibility and freedom, not only in what payment methods I choose but also in how I manage my accounts payable processes, such as approvals. A solution like Stampli offers significant advantages in vendor document sharing, invoice management, and payment handling, making opting for an independent solution a good investment.
Stampli Direct Pay – Take control of ACH vendor payments
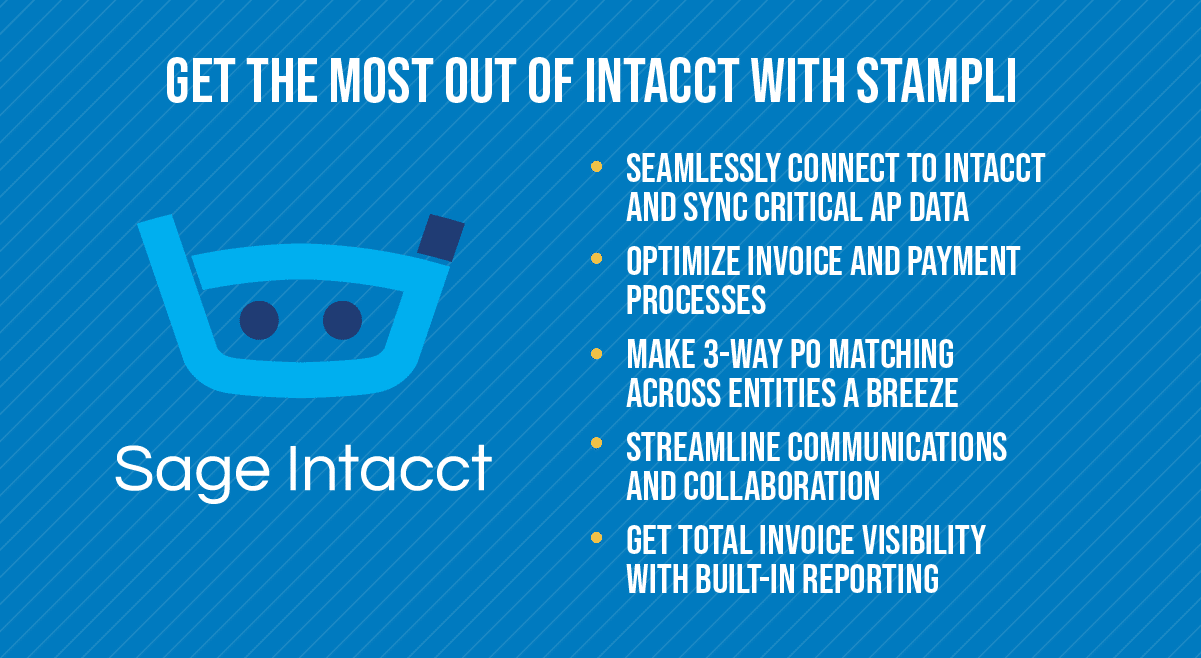
Stampli Direct Pay is a payment-agnostic payment solution that extends your payment efficiency, visibility, and control over invoice payments.
With Direct Pay, you can fully control your vendor relationships with no middle party needed for your vendor payments. And with seamless API integration with Sage Intacct and most major ERPs and accounting software, you can be confident that your entire company can access accurate real-time business transaction data when needed.
Here’s how Stampli Direct Pay gives you total control over vendor payments:
Streamlined payment runs
Get easy access to payment details and supporting documents to make payment approval simple.
Easy and accurate ACH reconciliation
Batch process your ACH payments with individual reconciliations in your bank statement – no more manual matching transactions. Other payment solutions make you log into a separate system – outside your bank – for reconciliations.
Powerful vendor portal
Let vendors provide payment information, set how they want to be paid, and check payment status with a simple and powerful vendor portal.
Own your data
Keep your vendor data! You can easily download your vendors’ payment information from Stampli Direct Pay should you move to a different payment provider.
Direct ACH payments
Make ACH payments directly from your bank account without setting up or funding a settlement account.
Handle consolidated and partial payments
Get maximum payment flexibility to make partial payments, consolidate payments, or issue vendor credits.
Take control of your ACH vendor payments. Contact Stampli today for a free demo of Stampli Direct Pay.